Wednesday 27 July 2016

Card and Art Display Board

Hello beauties, 
It was recently my Niece's 3rd birthday. Lately she is really into getting photos and cards in the mail. So in addition to sending her some I decided to make her a place where she could display them and keep them, along with any art she made.

To make this project I designed it in my Silhouette Studio, as you can tell I went for option #3. 

 I used a scrap of plywood I had lying around. I stained it lightly with the good-olde vinegar and steel wool trick to give it some vintage feel. I cut the vinyl out with my Silhouette Cameo e-cutter and stuck it to the plywood.

I also cut out my "handmade" stencil that I designed and painted over that so they would know that I made it.

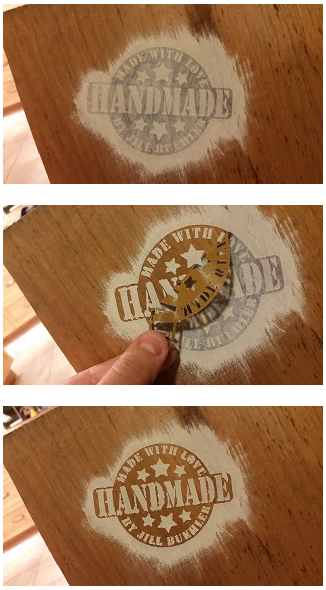
I painted over the Stencils with Dulux indoor paint (indoor or outdoor paint both work it doesn't matter which you use)

I let it dry and added another coat.

 Once it was dry I pealed off the vinyl stencil and nailed cotton string into the sides. I added a few cloths pins for hanging.

The finished project looks great! What do you think? 
After note: After I gave it to her I realized that she would have preferred option #1. So apparently Auntie Jill (me) should have made the one with Audrie's name on it as she is 3 and 3 year-olds like their names. Oh well, now I get to make another project with her name on it.

Thanks for stopping by,
Stay creative my darlings,
-Jill

Sunday 10 July 2016

Beachy Congrats

Hello Friends,
Today I am participating in a couple of card challenges: ColourQ #349, and Paper Craft Crew Card Sketch #201. The colour combo for this card is:Real Red, Marina Mist, Island Indigo, Basic Grey, and Whisper White. For the focal point and greeting I just printed something off the computer, as I didn't have the right image.


For Embellishments I used Marina Mist bakers twine and an old mini bottle cap I had lying around that had been flattened in my Big Shot. The DSP is from Christmas several years ago. Here are a couple of close ups on the card.
  

Here is the Colour Combo for this card:
 

Thanks for Stopping by, 
Stay creative my Darlings,
-Jill

Happy Puzzle

Hello Internet lovelies, 
Today I am sharing with you a card I made for the CAS Colours & Sketches Challenge #181. This week's challenge is to make a card using Cucumber Crush, Soft Suede, and Elegant Eggplant. The Challenge also said that "You may also use white, ivory, kraft, or black for your card base and layers, for image outlines, or for sentiments," So I used some Kraft too to make it lighter. -I tried Soft Suede as a background and it was too dark.


For the Puzzle I sponged a piece of Whisper White cardstock with Cucumber Crush, Soft Suede, and Elegant Eggplant. I than ran it through my Silhouette Cameo to cut it into a puzzle. I glued it on slightly off centre to add visual interest, and added a die-cut greeting that I also cut with my Silhouette Cameo. Then I just layered it onto a card base.

Here is a close-up on the details:

Here is the Colour Combo for this card:

Thanks for stopping by, 
Stay Creative my darlings,
-Jill

Sweet Little Cherries

Hello out there,
I am happy to share with you sweet little cherry card I did up for two challenges: CAS(E) This Sketch #180, and Color Throwdown #400. For this Card I used what they call a classic color combo that totally made me happy: red, green and white!


 The little cherries are so cute! Also they are fitting as I just ate a few dozen of the delicious little guys. As you can see by the colour combo I heavily used the colour combo inspiration photo as inspiration for my card.

Here is the Sketch and Color Combo for this card:
 

Thanks for Stopping by, 
Stay creative my Darlings,
-Jill

Letters of Christmas in July

Hello out there,
I am happy to share with you a couple Christmas cards I did up for two challenges: CAS(E) This Sketch #180, and Color Throwdown #400. For this Card I used what they call a classic color combo that totally made me happy: red, green and white! I also Added Very Vanilla and Chocolate Chip as they were both in the DSP I wanted to use. The first one is NOEL.


 Here is the second one, XMAS.

Which of the two do you prefer? I'm torn... just like the paper.... lol. (wow that was a terrible joke, sorry)

Here is the Sketch and Color Combo for this card:
 

Thanks for Stopping by, 
Stay creative my Darlings,
-Jill

Olive and Rose Chevron for YOU

Hello Peeps of the Interwebs,
I am excited to share with you a card I just whipped up for CASology #205: Chevron. I used a simple colour combo of Old Olive, Rose Red, and Whisper White and some old Paper Pumpkin stamps I had laying around. I embellished it with a few distressed paper flowers I punched out and some sparkly rhinestones.


Here is a close-up on the card. I am really happy at how it turned out. its really cute but also simple too.


Here is the Stencil I used for the chevron. for the Old Olive bits I used a Brayer, and then for the Rose Red I sponged it to made it more crisp.


Here is the Inspiration for this card:


Thanks for Stopping by,
Stay creative my Darlings,
-Jill

A Sunny Greeting

Hello Internet peeps, 
Today I am excited to participate in Challenge #61 from TIME OUT Challeneges: Inspired by Words.
The words of inspiration this week are: "Wherever you go, no matter what the weather, always bring your own sunshine" by Anthony J. D'Angelo


To make this card I cut a sun with rays on my Silhouette Cameo and stamped the stripes from Gorgeous Grunge in Bermuda Bay. The banner is made using some spare Paper Pumpkin bits and stamps from ages ago. My Colour Scheme is Whisper White, Bermuda Bay, Daffodil Delight, and Tangerine Tango.

Thanks for Stopping by, 
Stay creative my Darlings,
-Jill

LinkWithin

You May also like: