Wednesday, 20 May 2015

Sunflower Restful Days

Hello Crafters,
Today I spent a nice chunk of time in my craft room (about 4 hours) to complete a few challenge cards. Today I am participating in the As You See It Challenge #87 and Color Throwdown #343 challenges. I love the light and bring feeling of the get well card, it would perk me right up!


To make the card I used Bermuda Bay, Tempting Turquoise, Chocolate Chip, Early Espresso, Daffodil Delight and Whisper White. I used the SU Honeycomb Embossing folder stamped with temping turquoise and the brayer to transfer the pattern to the card stock. I then added the greeting from "Thoughts and Prayers" and cut a couple slits with my paper trimmer. Then I threaded the Daffodil CS though these slits.
The ribbon is not SU, and the burlap is naturally crumb cake coloured but I dyed it with re-inker and rubbing alcohol. The flower is the Pansy Punch and The Petite Flower Punch  layered. After I punched out the pansies I used my scissors to trim them up quite a bit. (they actually looked so sad alone but much better after they were layered together. 

Here is a close-up of the details of the card:
  

Here are the sketch and colors for this card:
AYSIChallenge087 

Thanks for stopping by today, 
Stay creative my darlings,
-Jill

Monday, 18 May 2015

Featured Artist AYSIC#086

Thank you to the design team at the As You See It Challenge blog for selecting my card as a winner for AYSIC#086. I feel very honored to be selected as this week's featured artist. There were some beautiful entries, congrats to all the other participating artists, your work was great.

AYSISnaps

Here is the card and original blog post.

Thanks for the recognition. 
Stay creative my friends!
-Jill

Thursday, 14 May 2015

Painting Practice

I have started trying my hand at canvas art mixed with vinyl lettering masking. Here are three projects I made recently.

Before Christmas 2014 I made this one. This first experiment with spay paint and canvas taught me many lessons about paint thickness and excess moisture but it still looks vintage and festive. I love the Dr. Seuss phrase from 'How the Grinch stole Christmas.' I went over some of the not so nice parts with white acrylic paint and antiqued it up with some brown acrylic paint and sanding.
I ended up gifting this one in the Work Christmas Gift exchange game and everyone was very excited about it and the Pillows I made that went with it.

For this other Christmas project I had something more like this big Merry & Bright sign in mind but the small one is cute too. I love the gold look.


Here it is displayed on our fireplace mantel in the top right of the photo.

This project I used inspiration from a few different projects I saw on Pinterest. I wanted lights like Stars or the Merry & Bright inspiration, an HP quote, and different colours.
The quote I had already selected was "Happiness can be found even in the darkest times if one only remembers to turn on the light" spoken by Professor Albus Dumbledore as he addresses the pupils of Hogwarts in the Great Hall at the start of the film The Prisoner Of Azkaban. I thought this quote would be well suited to a lighted canvas project as it even says to 'turn on the light' and I like puns like that. (I am Lame, I know.) So i searched it on Pintrest and found this EXACTLY the project I was looking for. It was perfect, All I needed to do was make it my own.


I printed out the letters with my cameo and adhered them over the white canvas. I then spray pained over the letters with black and added blue acrylic paint with a sponge. After it had dried I removed the vinyl letters and voila!

The next step was to add the lights, I poked holes in the canvas with a tack at "random" intervals to create stars then I pushed the lights through those holes.  I secured them on the back with Duct Tape, it's not pretty but it works.

I am really happy with how this turned out and I use it as a night light.

Thanks for stopping by today,
Stay creative my darlings!
-Jill

My Nerdy Clothing Creations

After making my husband a t-shirt (as one of my first Silhouette projects) and then some fun Christmas presents for my Hubby and his dad and brother I couldn't help but make some nerd gear for myself. 

I started out making a Harry Potter shirt with this sweet Harry Potter Spells Lighting Bolt Image I purchased with the Hogwarts House Crests in my other post. (Can you tell that I am a big HP fan yet?) This design took FOREVER to weed, (blarg) and that really sucked cause I learned after the iron on process that I was making a mistake in how I was Ironing on the Vinyl and now it is only an 'around the house' shirt cause I burned wax into it.. Oh well, at least the mistake taught me lessons I have learned from.


I made a great Sherlock T-shirt inspired by this one on Etsy.  I got the Silhouettes of Sherlock and Dr. Watson here. This whole shirt was done with Heat Transfer Vinyl.


 My Dr. Who Shirt was also exciting to make. I used a Tardis, the text "The Doctor" and the heads of Dr.'s 10 and 11. The Tardis was painted on and all the rest was heat transfer Vinyl. 


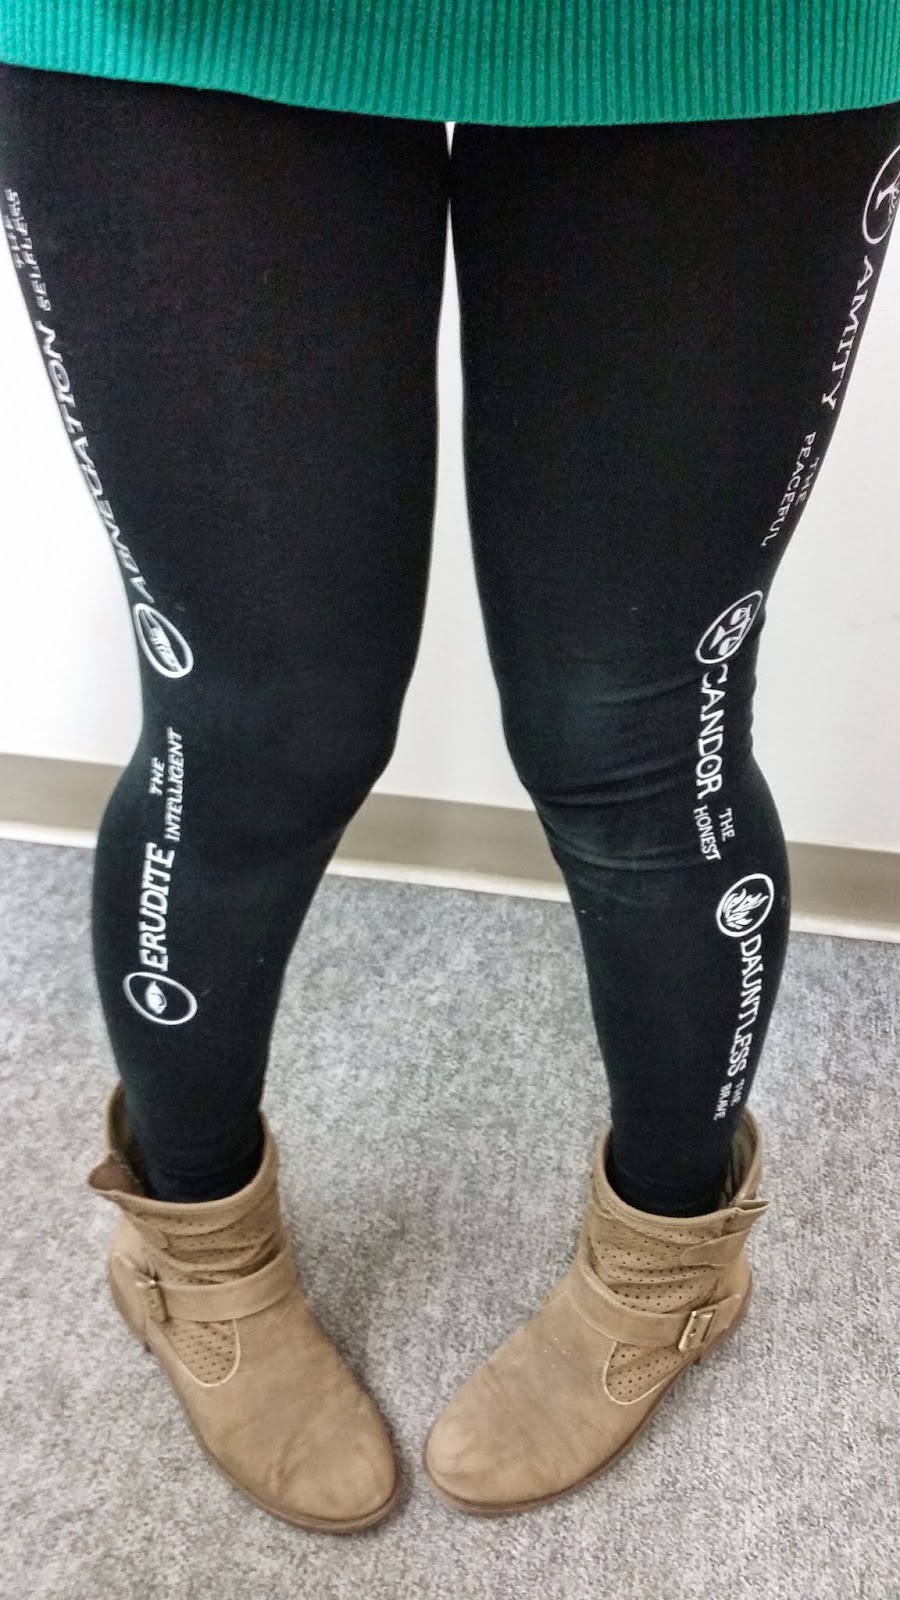
Next I tried a pair of tights.
I recently Read the Divergent Series, and while I am not the biggest fan of how Veronica Roth ended that series (Seriously why do that to a readership) or her changing writing style. Yet I did very much enjoy the story. I thought the factions were actually quite a cool idea and I decided to add them to a pair or tights with Iron-On Heat Transfer Vinyl. If I did this again though I would use fabric paint as I move a lot and my tights are quite stretchy and I would prefer not to re-set the vinyl every second wash.
   

Anyways I am quite happy with these creations and will soon be trying a few more designs. (My husband has offered "my services" to make a shirt for a Volkswagen friend of his.)

Wednesday, 13 May 2015

Watermelon Birthday

Hello friends,
Today I wanted to create a card and participate in a card challenge or two. Today's card is an entry in two card challenges, the first one is a sketch from As You See It Challenge #86, and the second is a colour combo from Colour Me CMCC #71. I liked the light and fun watermelon color combo and the cute playful sketch.


The only thing I couldn't decide on was weather I preferred the black or white text on the "Happy Birthday" greeting, I think both are nice, The white is softer and feminine and the black is more of the watermelon feeling in the inspiration photo. 

To make this card I used Melon Mambo, Pear Pizzazz, Pink Pirouette, Basic Grey, Whisper White, and Silver Metallic for the color combo. I stamped the Dictionary Background on the Melon Mambo CS, Layered the Pink Pirouette and Melon Mambo on top of the Whisper White and then added stitching with my sewing machine. This piece was popped up using dimensionals.
I then added the strip of Basic Grey CS from my scraps stash, tied some metallic silver bakers twine around the front of the card, added some itty bitty pearls and the focal greeting.
For the focal greeting I used Yippee-Skippee and Banner Greetings (Hostess) stamp sets. The "Yippee-Skippee" was stampeds with Pear Pizzazz ink on Pear Pizzazz CS and the "Happy Birthday" was stamped with Pear Pizzazz ink on Whisper White CS (in the Black version I also went over the text with a fine tip marker). I also flagged the greetings by bending them with my bone folder to make them pop. The flower was made with three punched out flowers using the petite petals punch and topped off with a large pearl. Both greetings and the flower were then layered on a piece of silver metallic paper punched with the decorative label punch.

 Here is a close -up of the details in both the black and white versions. Which do you prefer, the black or white?
  

Here are the two challenges that inspired this card.
AYSIChallenge086 

Thanks for checking me out today. 
Be creative my friends.
-Jill

Thursday, 26 March 2015

Spring Time Banner

Hello crafty friends and un-crafty friends alike. 
The other day I finished my spring banner for my office at work. I have been displaying a theme banner every month at work in my office since valentines day. This is the third banner (hopefully I will get around to showing off the first two soon) I made for work. and I would like an additional one for home, but I will attempt that later.

This banner is made with some pretty retired SU DSP from three different packs in (Cottage Garden) Certainly Celery, (a Baby One) So Saffron, and (Sale-a-bration 2013) Pool Party. I also used a lot of die-cut butterflies, Punched Flowers, Punched Butterflies, Simply Pressed Clay Flowers and Mini Close Pins as embellishments.  
The Letters, Circles, Banner shapes, star-bursts, and intricate butterflies were all cut with my Silhouette. 
  

The colours I used for this project are: Pool Party, So Saffron, Certainly Celery, Marina Mist, Whisper White, Wisteria Wonder, Pistachio Pudding, Daffodil Delight, Strawberry Slush, Pink Pirouette, Rose Red, Calypso Coral, Tangerine Tango , and Coastal Cabana.

I made two hanging sections -one of flowers and one of butterflies- on each side to give more length and interest to the banner.
 

 Thanks for checking out my creation, I hope you like it! 
Stay Creative my Friends.
-Jill

Tuesday, 17 March 2015

I have a Silhouette Cameo

I ordered the Silhouette cameo on September 9th, 2014 and I have had it for nearly 2 months when I made these projects. When I ordered it my computer was in the shop for repairs. My Silhouette arrived in mid September around the 16th, but I hadn't been able to use it until nearly two months later because it took so long to get my computer back. 
I was wondering and wondering what to make first, so many amazing projects, Art, clothing, decore, paper crafting, gifts, the possibilities were making my head swim. I felt like I knew exactly how to do everything with my machine from all the YouTube videos I watched, all the blogs I read and all the things I pinned on Pinterest. I however still didn't know the first thing about welding or working with a design that isn't made ready for me to print (it took me till now to get there, and there is still a lot I could learn I am sure).

Anyways here is what I decided on for a first project. I am a little bit of nerd if you can't tell from this vinyl decal. I purchased the download here. 
 

After that I made a cut out of Olaf from Frozen. Here is the work in progress as I don't have a photo of the final result but here is where I got the file for him and you can guess what he would look like from the layers.
  FREE olaf .svg

 Then I tried using freezer paper as a stencil and fabric paint to paint a t-shirt. I used a image I found online and transformed it into a cut file. (I learned much in my first week with my silhouette) My husband was very happy with this "gift."
  

After those projects I tried my had at Glass etching, OMG I love Glass etching!!! Fun Fun Fun! Check out my Harry Potter themed Shot Glassed. I Designed these myself with some Pinterest inspiration.


(If you want to buy your own beautiful set I like these ones on Etsy.)


Thanks for checking this out!
Stay Creative my Darlings.
-Jill

Friday, 7 November 2014

Wetlands Masking Technique

Today I am really excited to share a few cards with you that I made yesterday. Now I have a sad truth to share, I ordered the Wetlands stamp stet in early June and the first time I used it was yesterday, that is five months... gulp. To be completely honest I haven't have a chance to stamp as much as I would like, but I am making a conscious effort to change that.
Both card I am sharing today use the wetlands stamp set and a masking technique.
This first card is the goose and sunset card. I started with the oval, straight line, and circle for the sun and sponged to create the sun (Pumpkin Pie and Tangerine Tango) and the sunset glow (Crushed Curry and So Saffron) against the horizon, then I finished off the sky with Pool Party. For the water I kept the oval mask and moved the horizon mask and sponged with Pool Party, Coastal Cabana, and Island Indigo. 
 After the sponging and removing the masks I stamped the goose, greeting, and reeds in Early Espresso. I added a few masks at the bottom of the card stock as I still wanted the image to stay close to the oval and the reeds would have come too low for my preference. 
I coloured the Goose with Soft Seude, Crumb Cake, and Early Espresso. I also added a few details to the his feathers with a white gel pen. I think he looks pretty good.

This second card I actually made first. Again it uses the Wetlands stamp set and sponging with masks. I used 3 masks for this card, one at the top and bottom of the card from torn paper, and one for the horizon. I started again with the sky and used Pool Party, Coastal Cabana, and Island Indigo. 
 After the Sky I added the sand for the beach. For this I used Crumb Cake and Soft Suede and I also added some water with Pool Party and Coastal Cabana. Next I stamped the reeds in Wild Wasabi and Garden Green.
 Finally I stamped the Birds and the greeting in Early Espresso and removed the masks and mounted it on a whisper white card base.

Thanks for stopping by today. Please feel free to let me know what you think of this project.
-Jill

LinkWithin

You May also like: